Training Manual: Distillation for Chemical Solvents
This manual covers the correct setup and operation of a common laboratory distillation apparatus, crucial for analyzing solvent purity and composition in petrochemical, paint, and thinner testing. Understanding and adhering to these procedures ensures accurate results and lab safety.
1. The Distillation Setup: A Core Procedure
Distillation is a separation process that leverages differences in the boiling points of liquid mixture components. In our testing lab, it's used to determine the boiling range of a solvent, a key indicator of its quality and composition.
SAFETY FIRST!
Distillation involves heating potentially flammable and hazardous substances. Always work in a well-ventilated fume hood, use proper Personal Protective Equipment (PPE) like safety glasses, lab coat, and solvent-resistant gloves, and never leave a distillation in progress unattended.
2. Key Components of the Apparatus
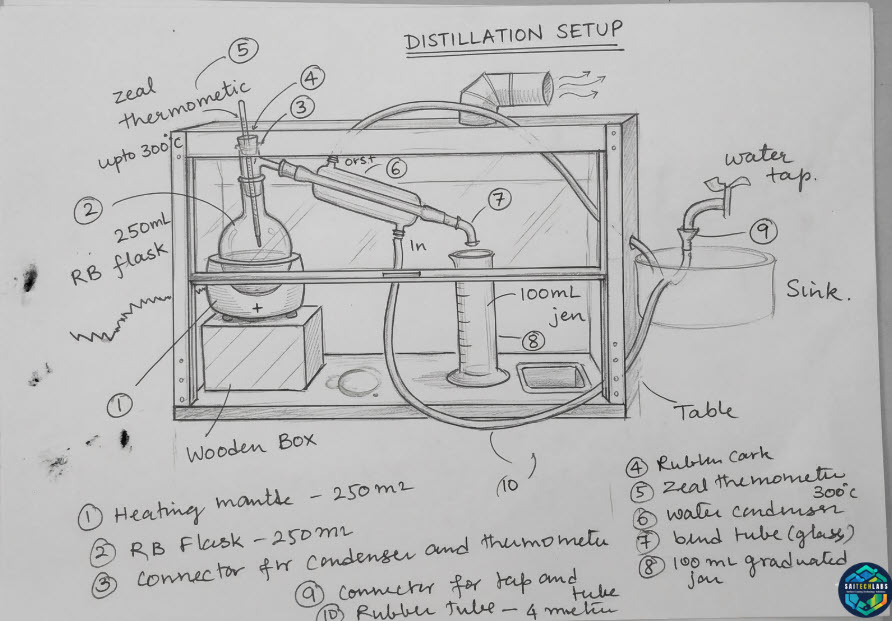
Reference: Detailed Distillation Setup (from our lab training material)
- 1. Heating Mantle & Wooden Box: Provides controlled heat. Mantle size must match the flask. Wooden box offers stability and insulates the mantle.
- 2. Round Bottom (R.B.) Flask: Holds the sample. Its round shape promotes even heating and is rated for the flask volume.
- 3. Connector for Condenser and Thermometer: The core adaptor connecting the flask, thermometer, and condenser.
- 4. Rubber Cork (or similar): Seals the thermometer connector, preventing vapor escape. A solid, temperature-resistant stopper is preferred.
- 5. Zeal Thermometer (up to 300°C): Measures the vapor temperature. The bulb must be correctly positioned at the condenser side-arm entrance.
- 6. Water Condenser: A jacketed glass tube. Cold water flows into the outer jacket ('In') and out the other ('Out'). Condenses hot vapor back into liquid.
- 7. Bend Tube (Glass): Directs the condensed distillate into the collection vessel.
- 8. 100mL Graduated Jar: Collects and measures the volume of the condensed distillate. Allows tracking of volume distilled vs. temperature.
- 9. Connector for Tap and Tube: Securely connects the rubber tubing to the water tap for condenser cooling water.
- 10. Rubber Tube - 4 Meter: Delivers cooling water to the condenser. Secure all connections to prevent leaks.
Also, don't forget the **Boiling Chips** to prevent superheating and hazardous bumping in the R.B. flask.
3. The Standard Procedure: step-by-step
- Assemble the apparatus as shown in the diagram, ensuring all connections are clean and secure. Secure flasks and condensers with appropriate clamps to a ring stand.
- Place appropriate-sized boiling chips into the empty R.B. flask.
- Carefully add 100mL of the solvent sample to the R.B. flask.
- Connect the water lines to the condenser. Water *must* enter the bottom connection ('In') and exit the top ('Out') to ensure the jacket is completely full. Start a gentle, continuous flow of cold water.
- Place the heating mantle snugly around the R.B. flask. Ensure the heating mantle and wooden box are stable.
- Begin heating the flask. Start at a low setting and increase gradually until the sample begins to boil gently.
- **Initial Boiling Point (IBP):** Observe the graduated jar. Note the temperature on the thermometer when the first drop of distillate falls from the bend tube into the jar.
- Continue distillation at a controlled rate (e.g., 4-5 mL per minute). Regularly record the thermometer temperature and the accumulated volume in the graduated jar. Common practice is to record at 10mL increments and other key points.
- **Dry Point:** Observe the thermometer carefully. The dry point is the highest temperature recorded just as the last drop of liquid evaporates from the main body of the R.B. flask. A dramatic temperature drop often occurs shortly after. *Note: For highly flammable materials, safety protocol may dictate ending the distillation before a true dry point, such as at a specified percent volume (e.g., 95%).*
10. After distillation, turn off the heating mantle and allow the apparatus to cool completely before dismantling. Keep cooling water running until the flask is cool to the touch.
4. Distillation Range of Common Solvents
A solvent's boiling range is a key specification, helping confirm identity and assess purity. Below are typical example boiling points and ranges for some common solvents encountered in petrochemical and paint/thinner labs. *Always consult the specific technical data sheet (TDS) for the current product lot.*
| Solvent |
Typical Pure Boiling Point (°C) |
Approx. Distillation Range (IBP to Dry Point, °C)* |
| Acetone |
56.1 |
55.5 - 57.0 |
| Toluene |
110.6 |
110.0 - 111.5 |
| Butanol (n-Butanol) |
117.7 |
116.5 - 118.5 |
| Xylene (mixed isomers) |
138.5 (avg) |
137 - 142 (depends on isomer mix) |
| White Spirit (Low Aromatic) |
~150 - 200 (mixture) |
140 - 210 (highly variable) |
*Ranges are typical examples and can be narrower for pure analytical grade solvents and broader for industrial grades.
5. Troubleshooting and Reporting
If the results are outside the expected range:
- **Low Boiling Point:** May indicate contamination with a more volatile solvent (e.g., acetone in toluene). Check for leaks in the setup where vapor could escape.
- **High Boiling Point:** May indicate contamination with a less volatile solvent or heavier residue. Ensure the thermometer is correctly positioned. Check if the heating rate was too high, causing superheating.
- **Abrupt Temperature Changes:** Ensure the boiling rate is constant. Irregular boiling can disrupt vapor flow.
Reporting: All results must be meticulously recorded in the lab notebook, including all recorded volume-temperature points, and the determined IBP and Dry Point, as per the lab's Standard Operating Procedure (SOP).